
Recently I have made solution for sell inventory project which is Basically about Shoes inventory management system So after reading the full Blog you will be able to create and track you own Inventory List in Excel.
FAQS:
How to do inventory in Excel?
What Excel formulas is used for inventory?
What VBA CODING is used for inventory?
FOR EASY UNDERSTANDING DIVIDE IT TO PARTS:
Below We are dividing sell Inventory project in parts:
- Create Sheet Where is we are adding Inventory Data
- Create a Form for Data Entry
- Coding for Data Entry Forms Using in Sheets
- Use formulas in Excel Sheets
- Format and that’s it.
SO, Let Start First we Need Inventory Data
- we have Created “sheet1” and rename it to InventoryData.
- Then PRESS ALT+F11 to open VBA Editor.
- Then right Click on Left Side Project Explorer and Insert New UserForm.
- Rename it to “sellinventory”
- Drag and Drop the Required Textboxes and label And Button to UserForm
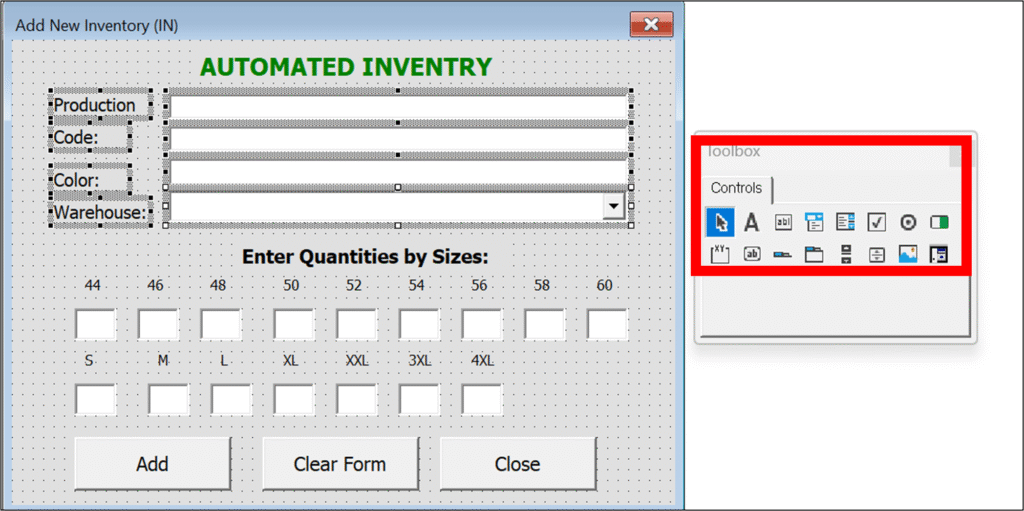
6. Same To Same Create two Other Form Sell and Purchase.
SELL:
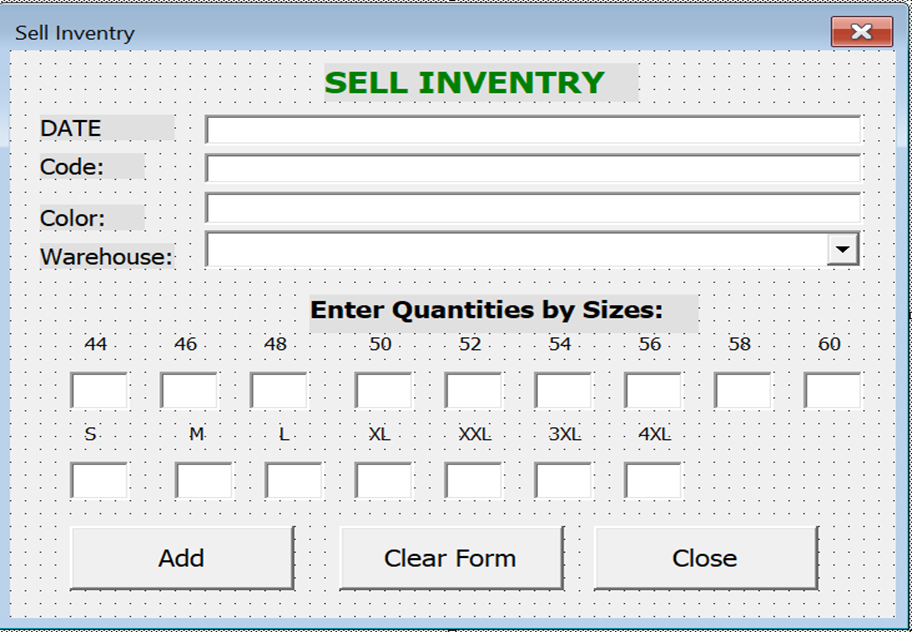
Purchase:
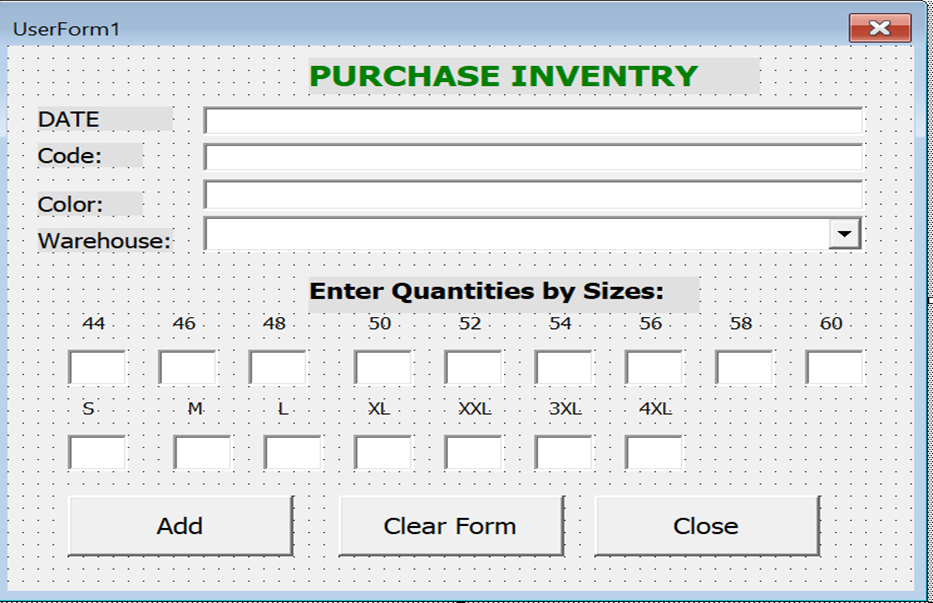
PURCHASE:
In the purchase Form Code for Add Button are given below:
Code:
Private Sub cmdAddUpdate_Click()
Dim wsData As Worksheet
Dim lastRow As Long
Dim productionType As String
Dim modelCode As String
Dim colorCode As String
Dim warehouseName As String
Dim i As Long
Dim sizeTextBoxes As Variant
Dim sizeLabels As Variant
Dim quantityValue As Variant
Dim transactionsAdded As Boolean
Set wsData = ThisWorkbook.Sheets(“InventoryData”)
‘ Get input values
productionType = Trim(Me.txtprod.Text)
modelCode = Trim(Me.txtModel.Text)
colorCode = Trim(Me.txtColor.Text)
warehouseName = Trim(Me.ComboBox1.Text) ‘ Use ComboBox1 for Warehouse
‘ Validation
If productionType = “” Or modelCode = “” Or colorCode = “” Or warehouseName = “” Then
MsgBox “Please fill in all required fields: Production, Code, Color, and Warehouse.”, vbExclamation
Exit Sub
End If
‘ TextBox names and size labels
sizeTextBoxes = Array( _
“txtSize44”, “TextBox1”, “TextBox2”, “TextBox3”, “TextBox4”, “TextBox5”, “TextBox6”, “TextBox7”, “TextBox8”, _
“txtS”, “txtM”, “txtL”, “txtXL”, “txtXXL”, “txt3XL”, “txt4XL” _
)
sizeLabels = Array( _
“44”, “46”, “48”, “50”, “52”, “54”, “56”, “58”, “60”, _
“S”, “M”, “L”, “XL”, “XXL”, “3XL”, “4XL” _
)
‘ Find next empty row
lastRow = wsData.Cells(wsData.Rows.Count, “A”).End(xlUp).Row + 1
‘ Insert basic product info
wsData.Cells(lastRow, 1).Value = productionType
wsData.Cells(lastRow, 2).Value = modelCode
wsData.Cells(lastRow, 3).Value = colorCode
wsData.Cells(lastRow, 4).Value = warehouseName
‘ Insert sizes (starting from column E)
transactionsAdded = False
For i = LBound(sizeTextBoxes) To UBound(sizeTextBoxes)
On Error Resume Next
quantityValue = Me.Controls(sizeTextBoxes(i)).Text
On Error GoTo 0
If quantityValue <> “” Then
If IsNumeric(quantityValue) Then
If CLng(quantityValue) > 0 Then
wsData.Cells(lastRow, 5 + i).Value = CLng(quantityValue)
transactionsAdded = True
End If
Else
MsgBox “Invalid value in size field: ” & sizeLabels(i), vbExclamation
Me.Controls(sizeTextBoxes(i)).SetFocus
Exit Sub
End If
End If
Next i
If transactionsAdded Then
MsgBox “Inventory entry saved successfully!”, vbInformation
Call ClearForm
Else
MsgBox “No size quantities were entered. Please enter quantities to proceed.”, vbExclamation
End If
End Sub
Clear Button:
Private Sub ClearForm()
Me.txtprod.Text = “”
Me.txtModel.Text = “”
Me.txtColor.Text = “”
Me.ComboBox1.Value = “”
Dim sizeTextBoxes As Variant
sizeTextBoxes = Array( _
“txtSize44”, “TextBox1”, “TextBox2”, “TextBox3”, “TextBox4”, “TextBox5”, “TextBox6”, “TextBox7”, “TextBox8”, _
“txtS”, “txtM”, “txtL”, “txtXL”, “txtXXL”, “txt3XL”, “txt4XL” _
)
Dim i As Long
For i = LBound(sizeTextBoxes) To UBound(sizeTextBoxes)
On Error Resume Next
Me.Controls(sizeTextBoxes(i)).Text = “”
On Error GoTo 0
Next i
Me.txtprod.SetFocus
End Sub
Close Button:
Private Sub CommandButton1_Click()
Unload Me
End Sub
That’s it the code is complete now the data will be inserting from Userform to Inventorysheet.
SAME LOGIC FOR OTHER FORMS BUTTON ARE USED JUST THE FORMS INSERTING DATA INTO OTHER SHEETS:
Next Step:
Setup Customer and Supplier Sheet:
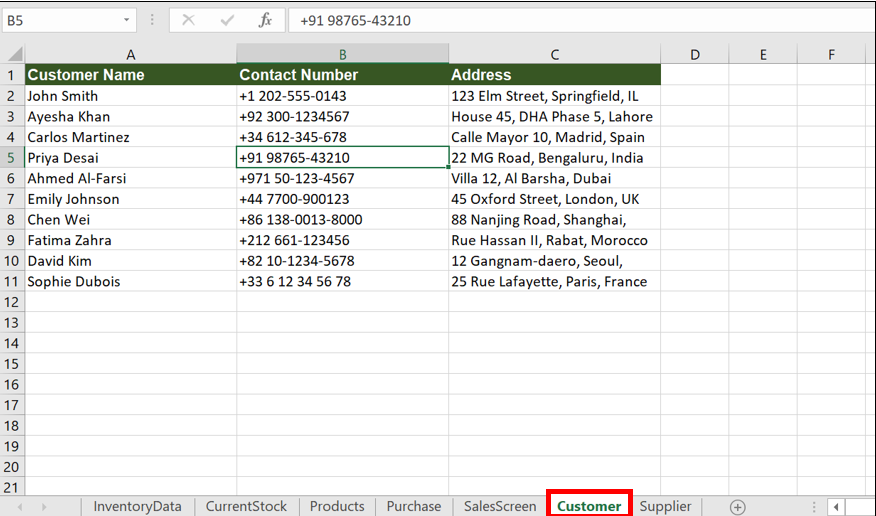
Supplier Sheet:
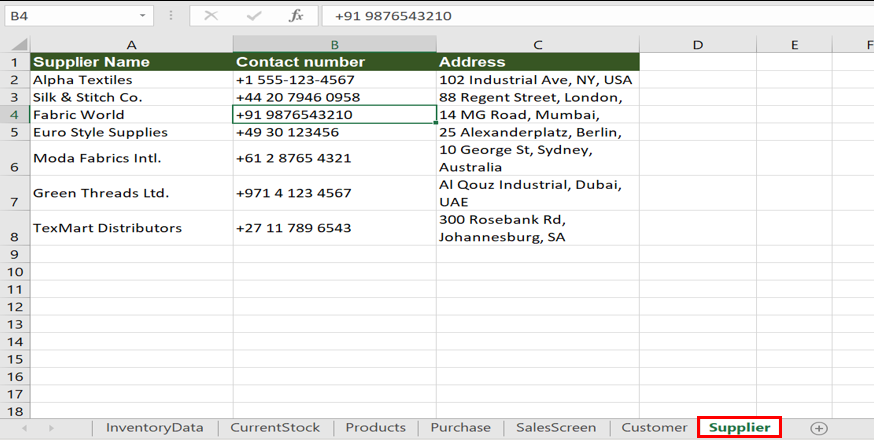
Good Let’s try Inventory sheet By Adding Inventory data by Userform:
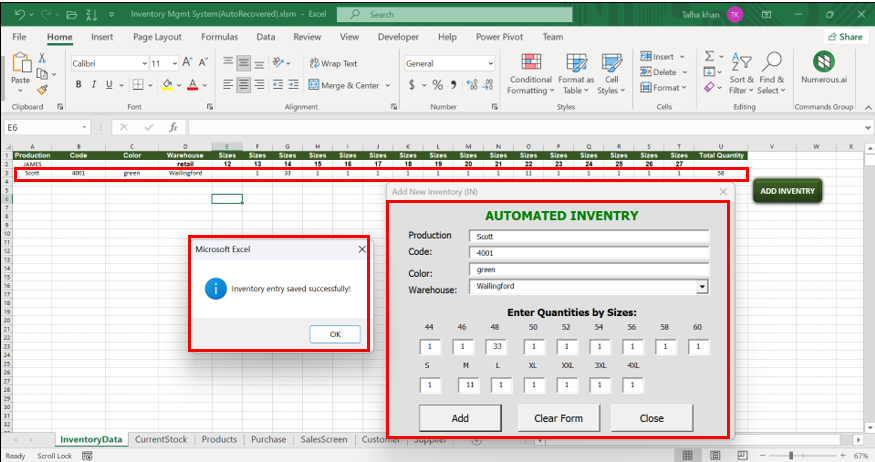
And it is working Perfectly As Shown In Above Image By the way Total in Coloumn U is calculated by =Sum() formula:
Next Step Setup CurrentStock sheet like below image To Find
Total In Stock Summary.
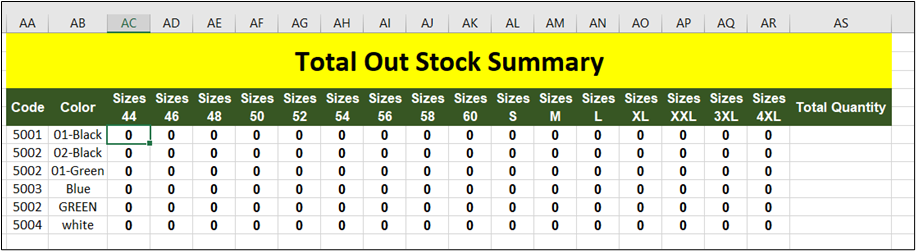
Total Out Stock Summary.
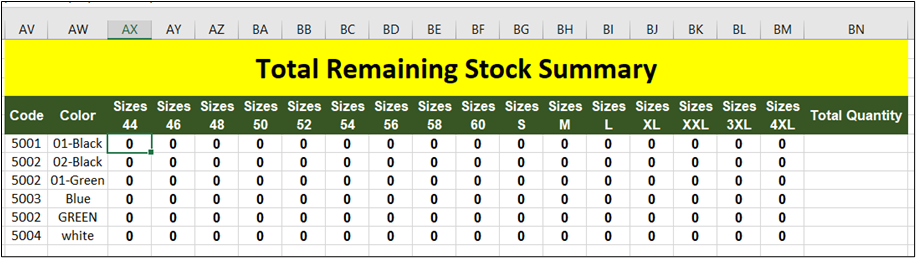
Total Remaining Stock Summary.
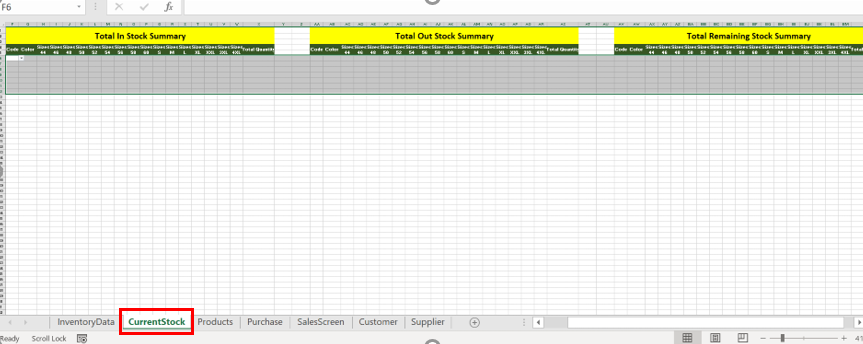
We have Created dropdown in coloumn F and G For Code and color
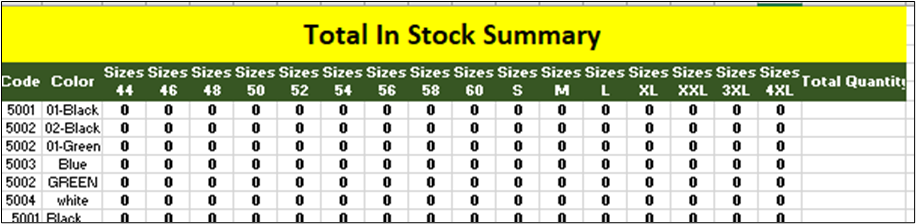
then Use Formulas In cell H6 (=IF(G6=””,””,SUMIFS($B:$B,$A:$A,$F6&”-“&$G6&”-“&H$5)))
and then drag to right till w6 and then below to W12
here it is look like:
Same for Total out quantity: For cell AC6 (=IF(AB6=””,””,SUMIFS($C:$C,$A:$A,$F6&”-“&$G6&”-“&AC$5)))
same Drag and Drop,
Here how it look like,
Same for Total Remaining Stock Summary:
For cell AX6 (=IF(AW6=””,””,H6-AC6))
same Drag and Drop,
Her how it look like.
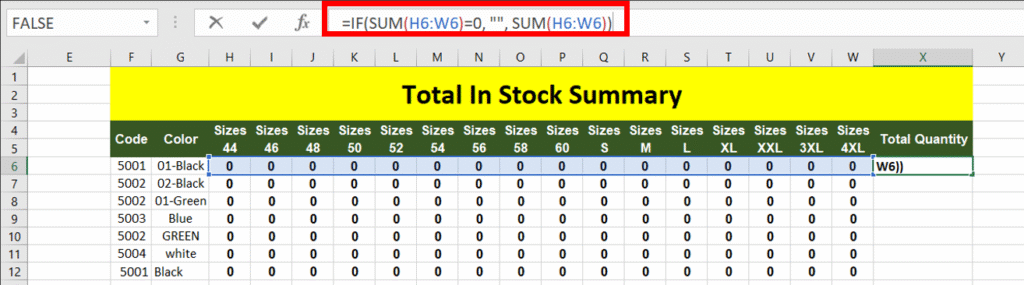
Totals Is calculated by below Formulas in image:
SO in that’s way CurrentStock Sheet is working in excel:
Next step is Products sheet In this sheet we are generating SKU MEAN The details of the products by coding:
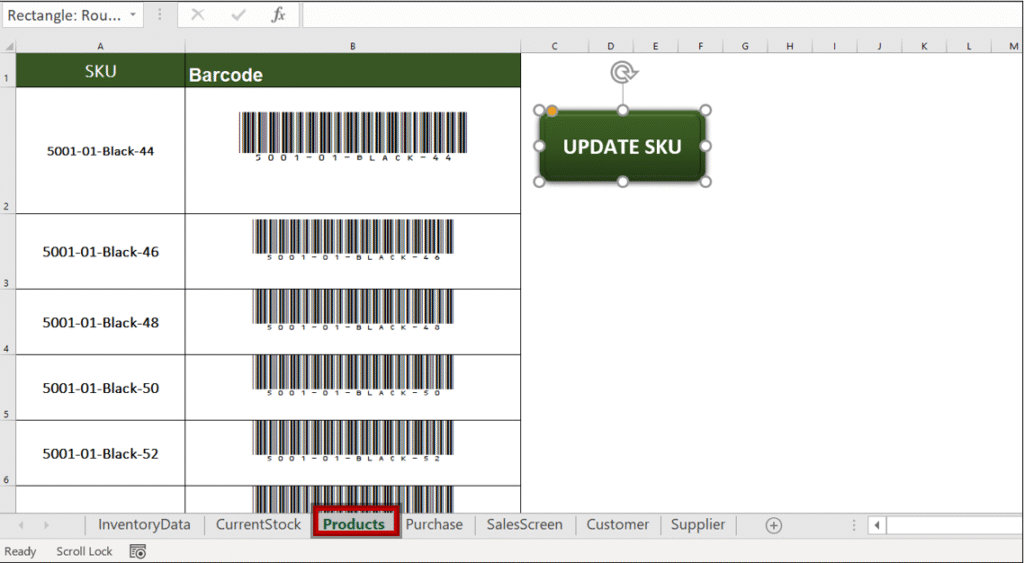
Code for generating SKU(Product detail):
Sub GenerateSKUs()
Dim wsSource As Worksheet
Dim wsTarget As Worksheet
Dim lastRow As Long, targetRow As Long
Dim r As Long, c As Long
Dim code As String, color As String, sizeLabel As String, sku As String
Dim quantity As Variant
Dim headerRow As Range
Dim sizeStartCol As Long
Set wsSource = ThisWorkbook.Sheets(“InventoryData”)
Set wsTarget = ThisWorkbook.Sheets(“Products”)
‘ Clear previous data in PRINTBARCODE
wsTarget.Range(“A2:A” & wsTarget.Rows.Count).ClearContents
‘ Find last row in source sheet
lastRow = wsSource.Cells(wsSource.Rows.Count, 1).End(xlUp).Row
targetRow = 2 ‘ Start writing SKUs from A2 in target sheet
‘ Assume headers are in Row 1, actual data from Row 2
Set headerRow = wsSource.Rows(1)
‘ Find where sizes start (typically after Warehouse column)
sizeStartCol = 5 ‘ Assuming sizes start at column E (5)
For r = 2 To lastRow
code = Trim(wsSource.Cells(r, 2).Value) ‘ Code in Column B
color = Trim(wsSource.Cells(r, 3).Value) ‘ Color in Column C
‘ Skip rows with no code or color
If code <> “” And color <> “” Then
For c = sizeStartCol To headerRow.Cells(2, wsSource.Columns.Count).End(xlToLeft).Column
quantity = wsSource.Cells(r, c).Value
sizeLabel = Trim(headerRow.Cells(2, c).Value)
‘ Only process numeric quantity > 0
If IsNumeric(quantity) Then
If CLng(quantity) > 0 And sizeLabel <> “” Then
sku = code & “-” & color & “-” & sizeLabel
wsTarget.Cells(targetRow, 1).Value = sku
targetRow = targetRow + 1
End If
End If
Next c
End If
Next r
MsgBox “SKU list generated in PRINTBARCODE sheet.”, vbInformation
End Sub
Formula For Cell B2 (=”(“&A2&”)”) And drag it to below.
Then apply IDAutomationHC39M Free Version Font On Coloumn To To Convert SKU into Barcode If not showing in font simply download and install from google font:
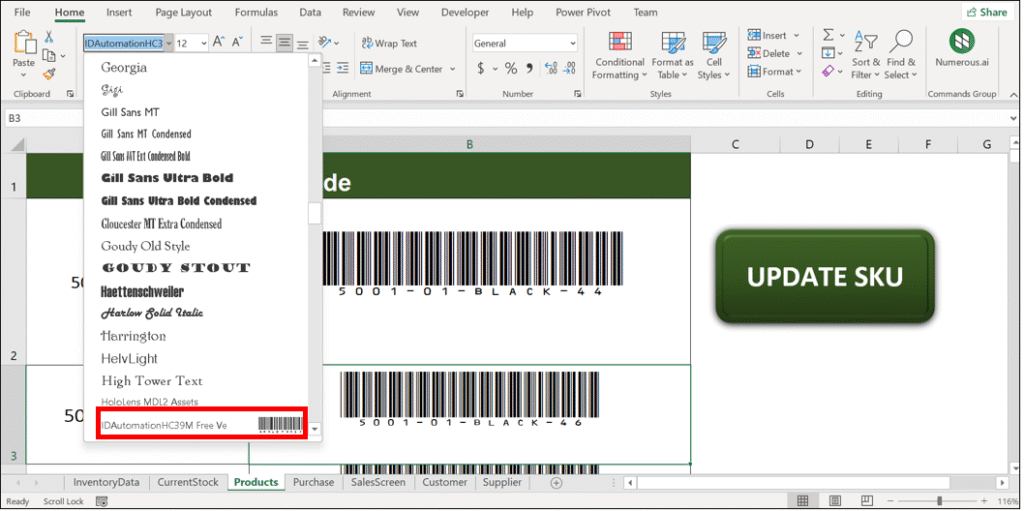
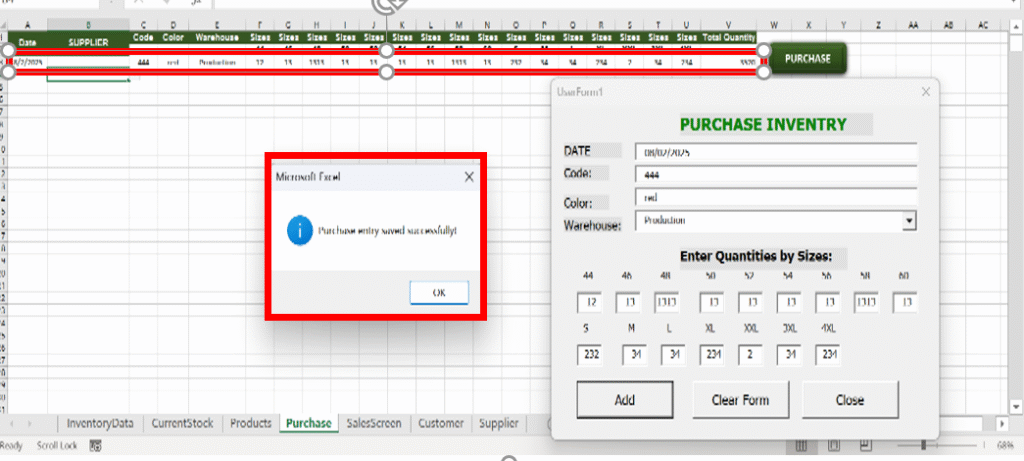
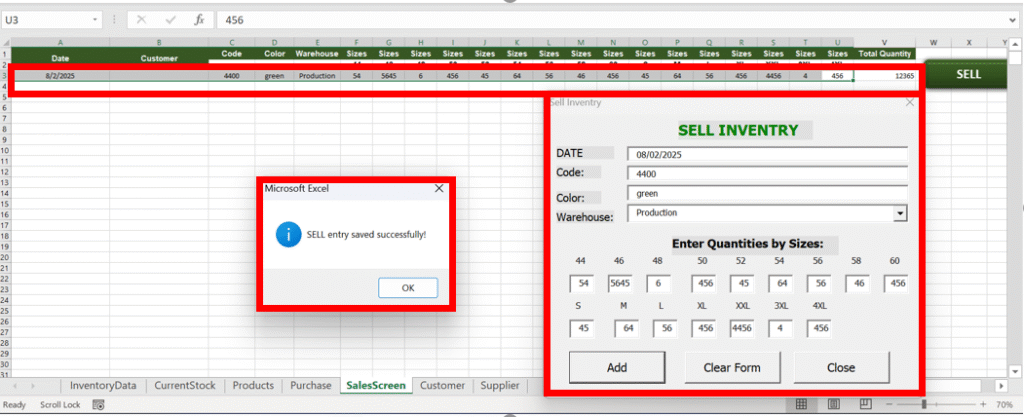
SAME LOGIC and coding just little bit changing in form label for Purchase and SalesScreen sheet:
and the working images of both forms are given below:
but supplier is getting from dropdown in Purchase sheet and same
customer in coloumn B is also getting from dropdown in SalesScreen sheet
IMAGES:
Create button for all forms
- In InventoryData Sheet Add Add inventory Button
- In Products Sheet Add UPDATE SKU Button
- In Purchase Sheet Add PURCHASE Button
- In SalesScreen Sheet Add SELL Button
AFTER adding all button Assign macro to its button
For example we are assigning macro to it:
FIRST Add shape caption Add inventory and assigh macro select the macro mean code we have write in VBA editor:
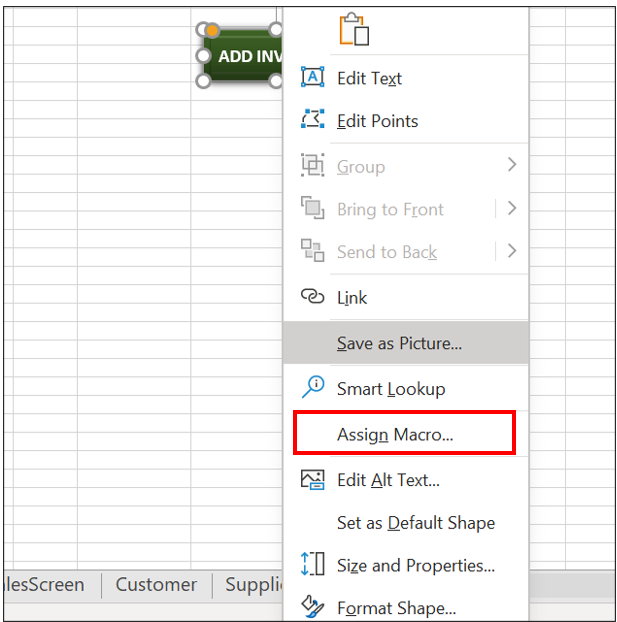
and then macro will be assigned to shape and now your shape will be working as Button
click on it and RUN Code, now fully automated and Beautiful sell Inventory is ready.
Thank you for reading and staying with us until the end. We look forward to meeting again in
Our next session, where we’ll dive into the highly requested topic of Excel automation